Look at images, not megapixels.
This series of posts will be on getting serious (I hope) about fine-art printing. In the film days I didn’t bother developing and printing myself; first I didn’t have the space for a darkroom and then I was reluctant to deal with the chemicals. But more importantly, there were plenty of overnight development labs in town and professional print makers that had a certain affinity to art. Color rendition wasn’t really an issue to discuss over a 4×5 slide on a color corrected light table. And I had a lot of prints done, as they were the only way to enjoy images, except perhaps for 6×6 slide projections.
All this has changed; it’s a fair guess that 99.99% of all images taken in 2017 will never be printed. And yet, most digital print makers that I have met would prefer you upload a file without even talking to them. “Yes, we know these customers who would prefer sitting next to printer” I was told, wanting to discuss the proofing of the result.
While the camera industry is still striving for the high megapixel numbers, take for example the recent offerings by Hasselblad and Fuji, the overall sales of consumer range equipment has been on a strong decline. The level of sufficiency for web display has been passed about 10 years ago in terms of dynamic range, and even longer in terms of resolution. The quest for high megapixel counts should therefore be driven by the fin-art printing, an enormous market if only 1% of the enthusiasts would have their work printed.
I don’t need to be convinced: There is no other way to view all the information captured by the high-pixel cameras or a scanned medium or large format slide. There are no monitors that can display 40 MP and the best inkjets will beat the monitors on color gamut. There is also no substitute for the haptic of a physical object as the result of the artistic process. A hard drive full of tiff files just can’t do that.
The color temperature of the ambient light heavily influences the appearance of printed images, however, their surface is easily damaged, and large prints are difficult to handle and transport. And the print maker must really know his equipment: I got more than once frustrated not knowing how to install the correct drivers, ICC* profiles (which is basically a characterization of a color device), and media parameter settings. Using a RIP, i.e., a third party printer driver, setting Printer manages color, and using Epson Luster on an Epson printer yielded okish results, but I hate the paper’s texture and reflections under gallery light.
But if you set Printer manages color, you are limited to the few options that come with the printer company’s own brand of papers, because the printer driver cannot know anything about third-party papers. It should be able though; if only the printer was connected to the internet and the paper came with a normed identification code.
Using third-party paper, printing from Photoshop setting Photoshop manages color and specifying a custom profile created by some colleagues in the photo-club created the worst results of the lot, too dense and with a lack of resolution. Obviously, there was too much ink spritzed on the paper. There are actually three root causes that must be understood: either the Photoshop color management settings aren’t right, the printer is still trying to apply color management despite getting corrected data from Photoshop, or the color profile is simply wrong. Even using Printer manages color and picking the closest paper available is better than generating a bad custom profile for example by making a test print and running it through a spectrophotometer. This stuff is best left to the professionals.
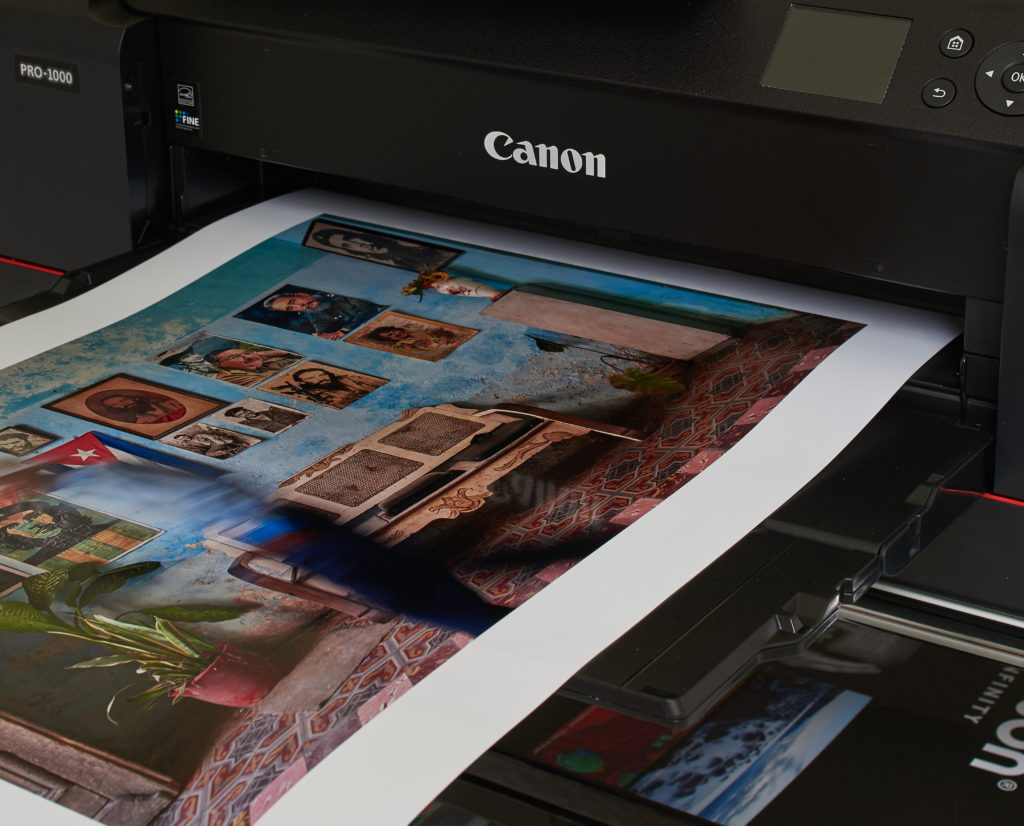
But now it seems that Epson and Canon, with their latest additions, have understood that the neurotic foreclosure of their systems has harmed the industry all together, and there is some visible effort made to improve user friendliness. And the Canon imagePROGRAF Pro-1000 for up to A2 sized prints has a form factor that doesn’t upset the significant other. That I opted for the Canon had to do with the gloss enhancer (they call it chroma optimizer), the air-feeding system, and most-importantly, because I had experienced problems with the Epson printer driver on the latest OS-X operation system. And the Canon is supposedly more user-friendly; with a good introduction by my vendor I got up to speed in about 3 hours. It cannot handle roll material though, if you are planning for larger panoramic prints opt for the Epson.
There are still some caveats and preparation steps to remember: It all starts with a calibrated monitor. With the display default setting of D65 my iMac retina display needed no profiling at all, as I saw basically no difference between the default profile and the one created with the Spyder color calibration tool (which is perhaps not the most sophisticated on the market). However, D50 may be a better match to how prints look side-by-side to the monitor under a mix of daylight (5000 K) and incandescent (quartz halogen) gallery lighting (3200 K).
Next, download the canned ICC profiles of your preferred papers from the home page of the paper manufacturer. Check before you procure a certain paper, that the company has indeed a profile for your printer. Because each paper has a slightly different shade and surface structure, it is important to use the ICC profile that is specifically designed for your paper/printer combination. Safe the downloaded ICC profiles in the correct location on your computer, in case of the MAC OS X, under /Library/ColorSync/Profiles. Note down the corresponding media settings corresponding to your profile.
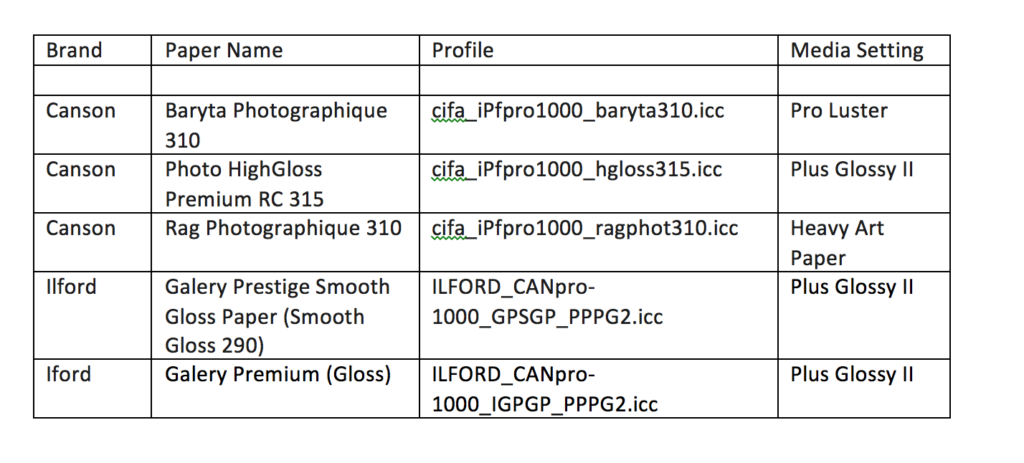
Example (that is, my own) configurations of paper, canned profile and media settings.
The Canson support has to be credited for an easy entry to the profiles from the task line of their home page, and featuring an introduction video for the Lightroom and Photoshop print menus when printing on Canon and Epson printers. Ilford support is already less optimal, paper that used to be called Smooth Gloss 290 is now named Gallery Prestige Smooth Gloss (there is no profile available for the Canon printer) and you can only hope that the Prestige Smooth Gloss 310 profile comes as close as it gets. And you have to register with your name and email address before you are allowed the download profiles (one-by-one as it seems). Tecco let’s you download (without registration) a complete profile package containing 24 profiles in a zip file that also contains a pdf with the media setting table.
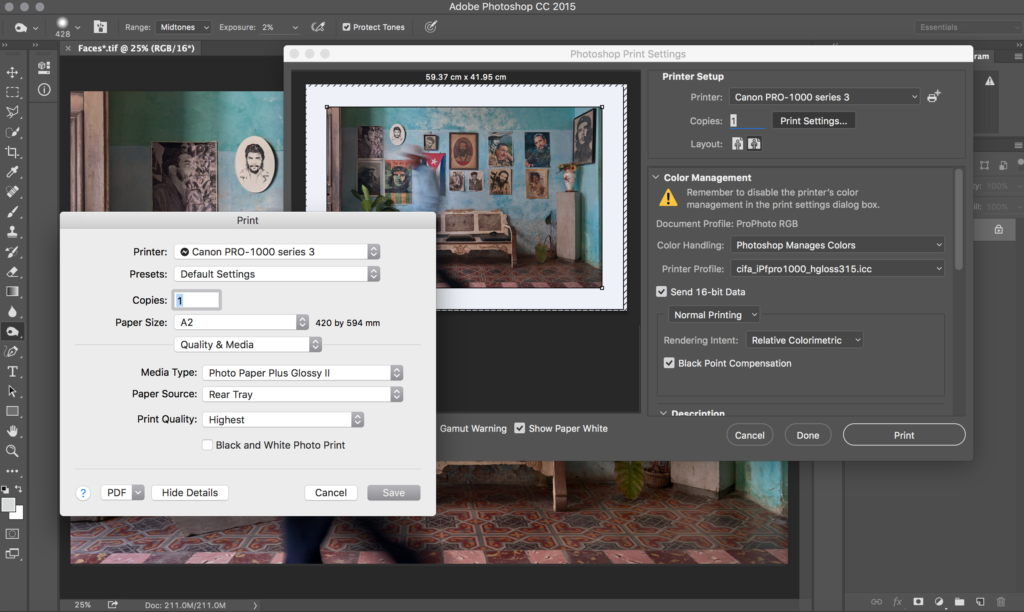
Before you press the button of all buttons, a few more things need to be checked and specified in the Photoshop Print Settings menu:
Layout: Select the correct orientation of the image. The preview image will display this correctly.
Printer Settings: This allows changing the media type, paper size, etc. that must match with the profile and paper size specified in the Photoshop Print Settings and very importantly with the media setting on the printer itself; see the examples of my current paper stock in the above table. One must then specify the appropriate profile for the printer/paper combination in the Photoshop print menu, and set the driver so that it turns off all color adjustment.
Ready to waste expensive paper and inks.
Color Management:
- Color Handling: Photoshop Manages Color gives you access to the Adobe Color Engine, which does a better job with Rendering Intents, compared to most printer drivers. A nice feature is that Photoshop saves the printer settings within the document and there are no adjustments needed if you want to reprint on the same paper. Photoshop manages color will also allow you to work in the ProPhoto RGB color space, as you should, because the usable exposure and color range of your camera is increased. Note the yellow exclamation mark asking you to disable the printer’s color management.
- Document Profile: It shows ProPhotoRGB as the embedded color profile of the image, not the printer!
- Printer Profile: You must specify your printer profiles and know which is the correct specification of media type in the printer driver. This is not so easy with many, confusingly named, printer profiles. Ilford papers are a bad example; see above table. In principle, you could rename the profile, but Photoshop requires you also change the ASCII and UniCode names that are embeded in the file (open the profile with the color-sync utility and click on ‘desc’. A better way is to save your setting under Presets in the Print Menue.
- Rendering Intent: This will specify how the software converts colors from the wider gamut image color space to the printer color space. While relative calorimetric (the default on most systems) handles out-of-gamut coloars by clipping these to the edge of the gamut but leaving in-gamut colors unchanged, the perceptual intent moves out-of-gamut colors into gamut, preserving gradations, but in this way also distorts in-gamut colors.
- Black Point Compensation: This should normally be on, as it will map the black point of the original image to that of the printer profile, helping to prevent blocked shadow areas.
Position and Size: The position and size is shown in the preview window. There is not need to resize the image in Photoshop as long as the print resolution stays above 240 PPI, or thereabouts.
Finally press print.
The usefulness (and limitations in terms of tonality and resolution) of uprezzing scripts for prints exceeding A2 (when starting from a 40 MP file), the experience with different paper grades and (hopefully not) clogged printer nozzles will be subject of a future post. Stay tuned. SR
Update after two weeks of printing (10 images A3+, 6 x A2, and 2 x A4): More than 2/3 of the inks begone, either for priming the system (filling the pipes and nozzles, nozzle check etc.) or because the original containers are only half full. Btw, Epson readily acknowledges their original cartridges containing only about 50 ml.
*International Color Consortium
One Comment
Ich bin sehr beeindruckt von deinen Photos.
Du schaffst es sehr gut auch die Stimmung des Moments zu transportieren.
Weiter so! Ich werde deine Veröffentlichungen verfolgen.
Ich hoffe dir und deiner Frau geht es gut.
Liebe Grüße Heike Martin (Vollhardt)